JABITAXE SETUP GUIDE (
- Jun 28, 2025
- 5 min read
HOW TO SETUP BITAXE GAMMA CORRECTLY
This guide walks you through each step to get your mining rig up and running quickly and effectively. The Bitaxe Gamma unit comes installed with the latest factory firmware.

Step 1: Attaching the Screen
Your Bitaxe Gamma includes a detachable screen to protect it during transit. Attach the screen to the unit using the fixtures provided.

Step 2: Power Connection
Connect the 5V power cable to a suitable wall outlet. The Bitaxe Gamma is compatible with global voltage standards. Attach the other end of the power cable to your miner.
Step 3: Initial Boot-Up
Power on your device and wait for the default factory screen to display "Bitaxe_XXXX," indicating it is ready for setup. You will notice your display scrolling with the following text:
Welcome to your new Bitaxe! Connect to the configuration Wi-Fi and connect the Bitaxe to your network.
Wi-Fi (For setup)
Bitaxe_XXXX

Step 4: Wi-Fi Connection
Use your smartphone or computer to locate and connect to the "Bitaxe_XXXX" Wi-Fi network. Select 'YES' if asked to continue without internet access.
Note: This is the built-in Bitaxe Setup Wi-Fi network that allows you to set up Bitaxe on your actual home Wi-Fi. If the setup page doesn’t automatically appear, open a browser and go to msftconnecttest.com.
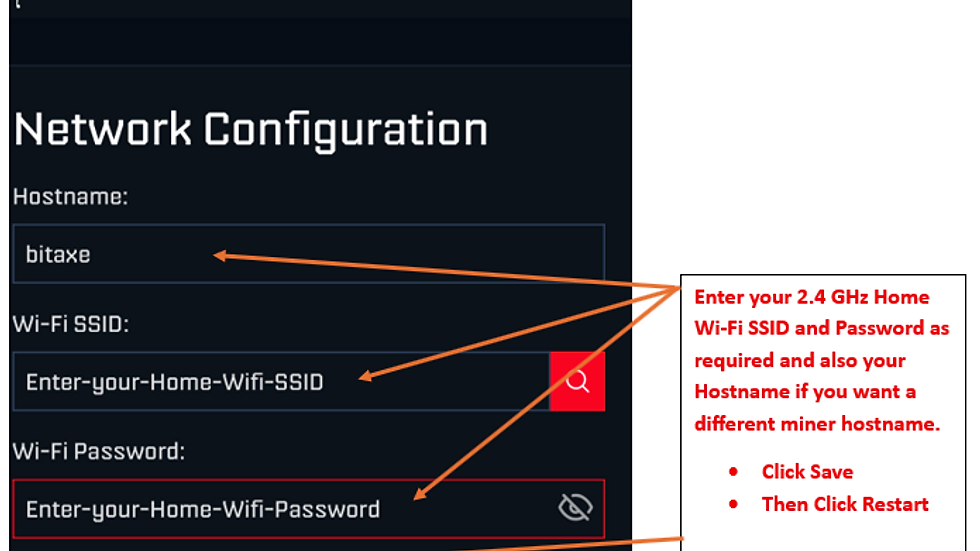
Under the 'Settings' in AxeOS, enter your home Wi-Fi details:
Wi-Fi ID: Your 2.4G Wi-Fi SSID
Wi-Fi Password: Make sure it's correct to avoid issues.
Save your actual home Wi-Fi settings and then click Restart in AXEOS.


Step 5: Customizing Your Miner with Your Own Settings
NOTE:
I recommend changing your fan control from automatic control to 100% under settings in AxeOS before any customization attempts. The Bitaxe Gamma ramps up quickly when it starts mining, causing a rapid rise in ASIC and Voltage Regulator temperatures from the high 30s to low 60s °C in just a few minutes when cooling is not optimal. After customizations are completed, you can play around with fan control.
By default, the firmware factory configuration does not contain your mining pool settings and Bitcoin address. You must modify these settings with your own pool settings and Bitcoin address.
Connect to the AxeOS using your browser by looking at the IP address shown on the display of your miner. It is in the format X.X.X.X. Open your browser http://X.X.X.X. If the IP Address shown is e.g., 10.0.0.188, you would type in your browser: http://10.0.0.188.
NOTE: It's http NOT https.

Go to Pool Settings. You will notice some default configurations that you need to change so that it can mine to your Bitcoin address using the pool that you want. Enter both the Main pool and Fallback pool stratum settings, including your Bitcoin address, and then click Save. Then click Restart, and you are done. It will restart and start mining.
Step 6: Before Overclocking
NOTE:
I recommend changing your fan control from automatic control to 100% under settings in AxeOS before any overclocking attempts. Overclocking the miner beyond the standard settings comes with a high risk of damaging the miner. Please overclock at your own risk.
Here is a simple sample of what you might need for a long-lasting overclock for your Bitaxe Gammas (we use the same in our OC lab):
Mean Well LRS-350-5 Power Supply (Can handle up to 7 Overclocked Bitaxe Gammas)
1 x 90 Degree DC Power Pigtails Cable, Right Angle DC 5.5mm x 2.1mm Male Plug (1 for each Bitaxe Gamma)
1 x Normal C13 Computer Power cable that you can cut one end and wire the LRS-350-5 PSU to the normal 120V AC outlet (Select the correct length: 6 feet or 10 feet)
5 end-connectors for the cables going to PSU (3 from C13 power cable, 2 from each Bitaxe Gamma Power cable) -- we usually just buy a kit of various end terminals (much cheaper)
You will need a crimper (to crimp the terminals to the cables) if you don't have any.
Links for amazon.ca below here:
Upgrading the Firmware
DO NOT UPDATE THE FIRMWARE AT THIS TIME - IT WILL BREAK THE UNIT. You can do this later if there is an upgrade available. Thank you!
KNOWN PSU ISSUE: VOLTAGE DROP FROM NON-ADJUSTABLE 5V DC PSU TO BITAXE GAMMA MINER
Using a simple explanation and calculations from rapidtables.com:
Voltage drop calculations
The voltage drop \( V \) in volts (V) is equal to the wire current \( I \) in amps (A) times 2 times one-way wire length \( L \) in feet (ft) times the wire resistance per 1000 feet \( R \) in ohms (Ω/kft) divided by 1000:
\[
V_{\text{drop}} (V) = I_{\text{wire}} (A) \times \left(2 \times L (ft) \times R_{\text{wire}} (Ω/kft) / 1000 (ft/kft)\right)
\]
The voltage drop \( V \) in volts (V) is equal to the wire current \( I \) in amps (A) times 2 times one-way wire length \( L \) in meters (m) times the wire resistance per 1000 meters \( R \) in ohms (Ω/km) divided by 1000:
\[
V_{\text{drop}} (V) = I_{\text{wire}} (A) \times \left(2 \times L (m) \times R_{\text{wire}} (Ω/km) / 1000 (m/km)\right)
\]
Using a Non-Adjustable 5V DC PSU (5V, 10A = 50W) as an example, we can approximately calculate the voltage drop:
Wire Type: Copper
Input Voltage: 5V Max
Input Current: 10A
Current Type: DC
Wire Length from PSU block to Bitaxe connector: 1m (100 cm)
Wire Gauge: 14 AWG, 16 AWG, 18 AWG, 20 AWG
If we only vary the wire gauge due to resistance in the wire, we can clearly see why any 5V PSU always has a voltage drop that sometimes affects the Bitaxe Gamma Miner.


| Wire Type | Copper | Copper | Copper | Copper |
|-----------|--------|--------|--------|--------|
| Input Voltage | 5V | 5V | 5V | 5V |
| Max Current | 10A | 10A | 10A | 10A |
| Current Type | DC | DC | DC | DC |
| Cable Length | 1m | 1m | 1m | 1m |
| DC PWR Wire Gauge | 14 AWG | 16 AWG | 18 AWG | 20 AWG |
| Voltage Drop (V) | 0.165312 | 0.262857 | 0.417959 | 0.664581 |
| Percentage of Voltage Drop | 3.30625 | 5.25714 | 8.35918 | 13.2916 |
| Wire Resistance | 0.0165312 | 0.0262857 | 0.0417959 | 0.0664581 |
| Average Voltage Delta | 4.834688 | 4.737143 | 4.582041 | 4.335419 |
| Required Input Voltage to compensate for Voltage Drop | 5.2V ~ 5.4V | 5.2V ~ 5.4V | 5.4V | 5.4V |
Almost all of the affordable 5V PSUs manufactured in China or Asia typically come with 16 AWG or 18 AWG (Most of 5V PSU) or 20 AWG. This means that since they are Non-adjustable 5V PSUs and have no way to adjust the voltage to compensate for the normal voltage drop, it will normally trigger the under-voltage threshold in Bitaxe, which causes Bitaxe to shut off to avoid any damage due to high current being requested when the voltage drops.
Bitaxe Gamma Under Voltage Threshold: 4.5V
Bitaxe Gamma Over Voltage Threshold: 5.5V
The goal is to supply Bitaxe with consistent voltage at 5V+ at all times during standard operations or overclocking operations.
Best required adjusted voltage = 5.2V ~ 5.4V (Max)
NOTE:
I recommend purchasing an adjustable DC 5V, 10A PSU (50W Minimum) that will allow for voltage drop compensation and overclocking.
We offer the option of purchasing a readymade adjustable 5V PSU that allows for both voltage compensation and overclocking.


Comments